
Back
Installing Paravirtualization (PV) Drivers
This page explains how to install PV Drivers (virtualization drivers) to the OS of an instance (virtual server). For High Response Private Cloud Xen type, install Xen or XCP-ng, Xen-Tools.
PV Driver is a tool for optimizing virtual machine processing. It consists of I/O drivers and management agents. If you do not install PV Driver, the hardware will be emulated in the hypervisor of High Response Private Cloud and the hardware driver will run inside the instance, creating a major bottleneck.
Once the PV Driver is installed, various IO accesses bypass emulation and go directly through the High Response Private Cloud hypervisor, resulting in significant performance improvements.
On modern operating systems, the Xen PV Driver is installed as standard, but you can also install it manually or install a virtual machine state management agent to obtain various status information from the dashboard.
Therefore, after installing the guest OS, please install the virtualization drivers (PV Drivers) and management agent (xen tools).
How To Check
Check if virtualization drivers are installed
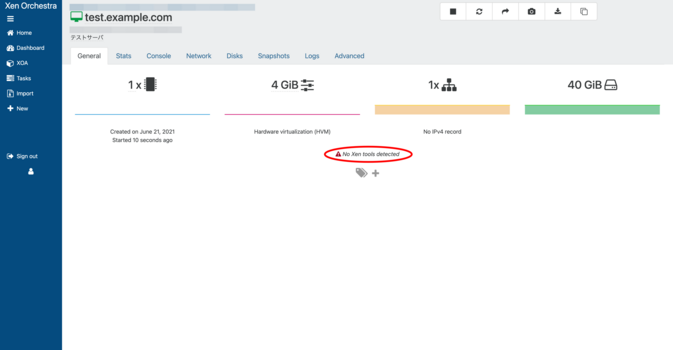
You can check this by selecting the virtual machine and selecting the General tab. If the virtualization drivers are not installed, the General tab will display “No Xen tools detected.”
After creating a new virtual machine, the virtualization drivers will not be installed, so please install them.
Install
Installing virtualization drivers on Linux
Most Linux distributions have the PV Driver built in, so you only need to install the Management Agent.
The Management Agent can be installed in two ways:
If the network is already connected
Xen booted in HVM mode defaults to “Realtek RTL8139” or “Intel e1000”. However, in almost all current Linux distributions, the Xen PV Driver is built in as standard, and the virtual network driver is automatically installed, making communication possible in most cases.
You can continue to use Linux in this state without any problems, but by installing Guest Tools you will be able to obtain information such as the network from Xen Orchestra.
Redhat Enterprise Linux, CentOS, Fedora, Alma, Oracle Linux, etc.
The guest tools can be installed as follows. You will need to add EPEL etc. beforehand.
yum install xe-guest-utilities-latest
It starts as follows:
systemctl enable xe-linux-distribution
systemctl start xe-linux-distribution
Ubuntu etc.
To install the guest tools, follow the steps below:
apt install xe-guest-utilities
If the network is not working
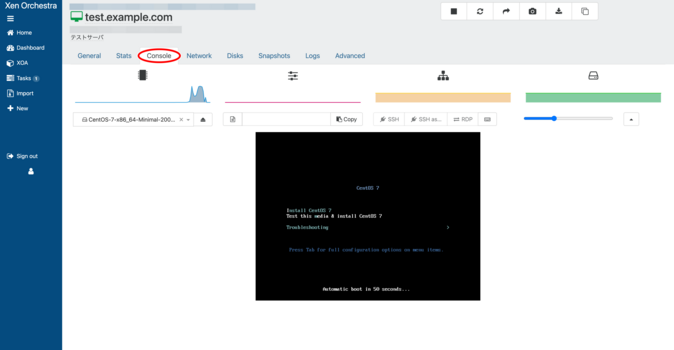
1. Open the “Console” tab
Open the screen of the virtual machine for which you want to install the virtualization drivers, and click the “Console” tab to open it.
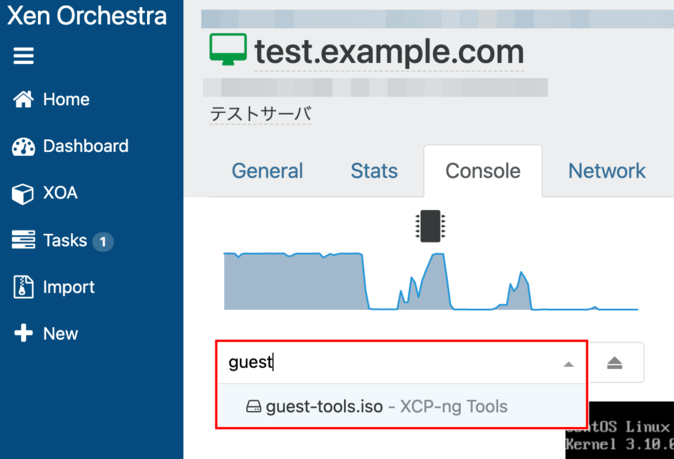
2. Find the installation media
Enter “guest” in the search box and click “guest-tools.iso” that appears as a suggestion.
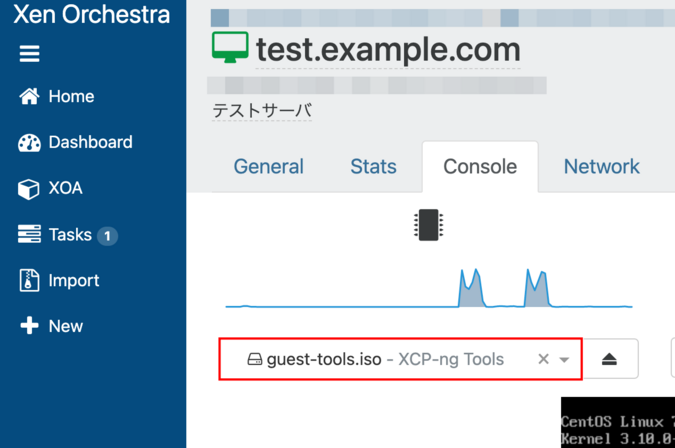
3. Select the installation media
“guest-tools.iso” was selected.
4. Mounting
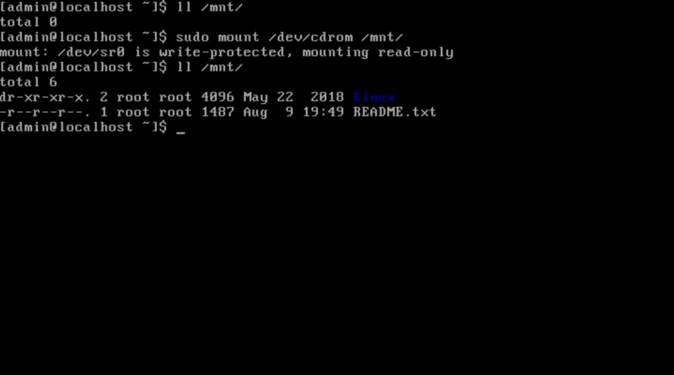
Mount /dev/xvdd. Make sure there are no files in the directory to be mounted (/mnt), and execute the following command with administrator privileges.
$ sudo mount /dev/cdrom /mnt/
Step 5: Install virtualization drivers
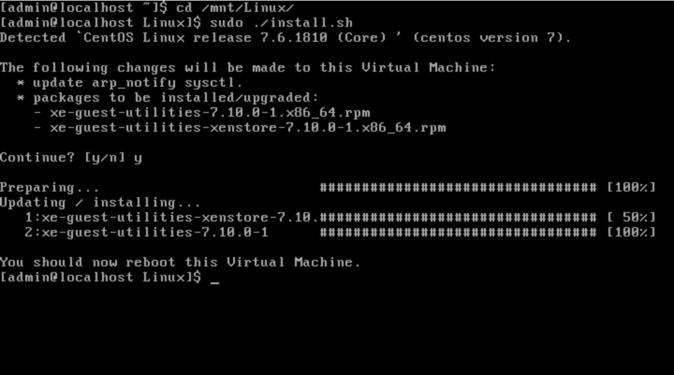
Move to the mounted directory (/mnt/Linux/) and execute the installation shell script “install.sh” with administrator privileges using the command below.
$ cd /mnt/Linux/
$ sudo ./install.sh
6. Done
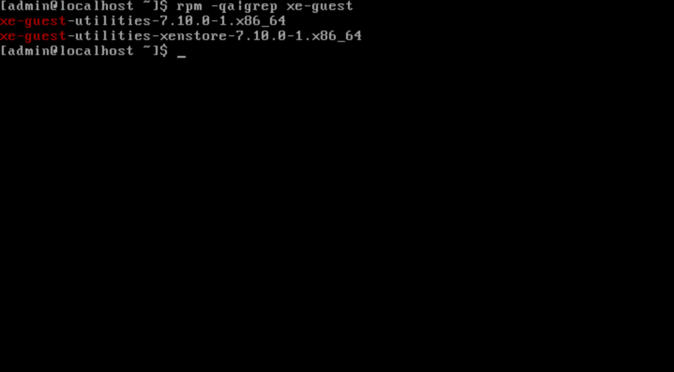
The installation will be completed when you reboot the virtual machine . You can check that it is installed with the following command.
$ rpm -qa | grep xe-guest
Installing Virtualization Drivers on Windows OS
For Windows systems, install the driver using the following procedure.
- Create a Snapshot
- Since the PV Driver is involved in booting the OS, we take a snapshot in case the OS fails to boot.
- From the Xen Orchestra VM, open the Advanced tab and check the Xen settings.
- Before installing the PV Driver, make sure it is set to “HVM”.
- If it says PVHVM, then you already have the PV Driver installed.
- Ensure that Manage Citrix PV drivers via Windows Update is OFF.
- If this is ON, the Citrix PV Driver is installed and it is assumed that it is PVHVM, so this installation procedure is not necessary.
- Before installing the PV Driver, make sure it is set to “HVM”.
- Download the Windows PV Tools from the following website.
- Be sure to check IO Driver, etc., install it as instructed, and then reboot to complete the process.
- After rebooting, go to Advanced in the VM and make sure it is in PVHVM mode.
About Citrix drivers
Windows instances transferred to HRPC using the Import function from a Xen-based cloud or an on-premise Citrix Xen Server may work if you enable “Manage Citrix PV drivers via Windows Update”. Although there are almost no problems, minor issues may occur, such as the management agent not working from XenOrchestra.
If you want to fix this, first create a snapshot, delete all Citrix PV Drivers and management agents, change it so that it can run in HVM mode, then set “Manage Citrix PV drivers via Windows Update” to OFF. Then install it using the method above.
Please note that this process will require multiple reboots, and each time the NIC and storage drivers are replaced, problems may occur.
Others
Support for 10G NIC
The network speed of the virtual network adapter is temporary, and unless there is a limit imposed at the virtual OS layer, the speed will be 1Gbps or more, even if the driver is Intel e1000. However, the speed is more efficient when the Xen NIC driver is installed.
I lost my Ethernet adapter right after a Windows Update and can no longer connect to the network
Starting with certain versions of Windows Server, the XCP-ng network driver is distributed, which allows Windows to automatically switch from the hardware emulation “RTL 8139” or “Intel e1000” to the Xen network adapter.
Below is the display of “Show hidden devices” selected from the View menu in Device Manager.
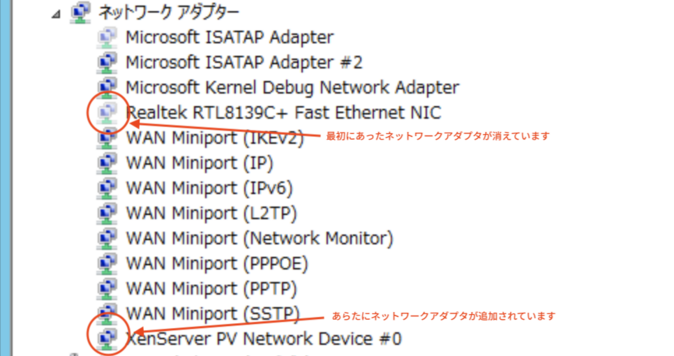
As shown above, “XenServer PV Network Device #0” has been added.
Due to Windows specifications, when the driver is switched, a new Ethernet adapter is added, so communication is possible by setting the correct IP address to the new Ethernet adapter. If the static IP address setting remains on the adapter that has disappeared (hidden), delete the adapter itself or delete the stored address information by setting it to automatic configuration, and then set it to the new Ethernet adapter.

 Japan
Japan Korea
Korea China
China Taiwan
 Vietnam
 Thailand
 Indonesia
 Portugal
 Spain
Spain France
 Germany
 Egypt
Egypt Russia
